


Prototyping doesn’t need to be complicated—or digital. Paper prototyping is a fast and effective method to explore, iterate, and validate your ideas before diving into high-fidelity designs. In this guide, you’ll learn how to create low-fidelity prototypes, map user journeys, and gather actionable user feedback.
Preparation
- Duration: 45 minutes - 90 minutes
- Participants: Solo or group
- Supplies:
- Several blank sheets of paper
- Marker or Sharpie (preferred)
- Pen or pencil
- Any app idea
Don’t have an app idea? No problem!
You can follow along using our tutorial example: Volunteer Village — an app that connects volunteers with local opportunities. Volunteer Village:
- Matches individuals with local volunteer opportunities based on their interests and skills
- Allows organizations to post volunteer opportunities
- Allows volunteers to connect
Learning Outcomes
- Understand the basics of wireframes and prototypes
- Learn how to illustrate concepts quickly
- Practice rapid iteration through feedback loops
What is a Wireframe?
A wireframe is a simple visual layout representing the structure and functionality of an experience. It focuses on layout and interaction without design details like colors or images.
Why Create Wireframes?
- Illustrate a concept quickly without perfecting it
- Iterate and refine ideas rapidly
- Get ideas out of your head and in front of others for feedback
- Create tangible but disposable artifacts for collaboration
Steps to Master Paper Prototyping
1. Warm-Up Exercise: Wireframe from Memory
- Choose a mobile app you like
- Spend 5 minutes visualizing its functionality
- Draw the app to the best of your recollection
- Don't worry about perfection - focus on capturing the essence
Goal: Practice quickly translating mental models into visual layouts.
2. Identify Key Functionality
- Select the core features of your app or website
- Examples might include:
- Account creation
- Login process
- Profile setup
- Key user journeys
If you have your own app idea:
- List out the core features you want your app to have.
If you’re following the Volunteer Village example, some features include:
- Browse volunteer opportunities
- Apply for a position
- Create an account
3. Map the Happy Path to Tell a Story
- Create a simple task flow using boxes and arrows
- Identify the key screens needed to communicate functionality
- Ignore error states or edge cases for now
Example – Volunteer Village:
Happy Path: Applying for a Volunteer Position
- Browse opportunities
- View details
- Apply for a role
- Confirmation screen
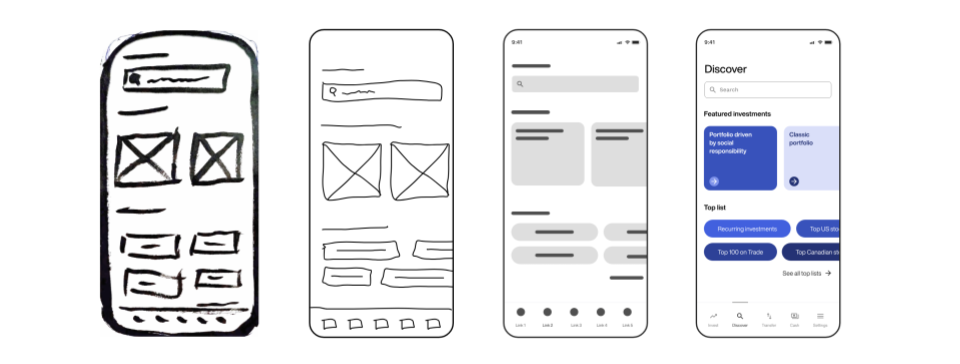
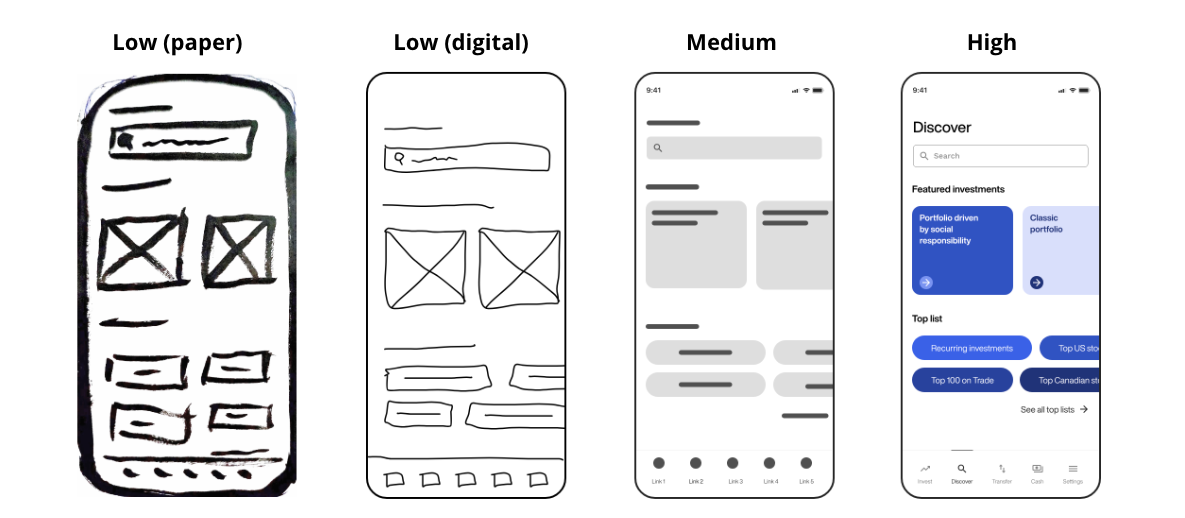
4. Create a Low-Fidelity Paper Prototype
- Rectangles can represent:
- UI frames
- Buttons
- Images (add an X)
- Form fields
- Lines can represent:
- Titles
- Body text
- Dividers
- Links
- Circles can represent:
- Avatars
- Buttons
- Progress indicators
- Images
Task: Sketch the key screens from your happy path.
Example – Volunteer Village:
- Screen 1: Browse Opportunities
- Screen 2: Opportunity Details
- Screen 3: Application Form
- Screen 4: Confirmation
5. The "Crazy 8s" Technique
- Fold a paper into eight sections
- Quickly sketch different variations of your screens
- Explore multiple design directions
- Move quickly and don't get stuck on details
6. Refine and Select
- Circle your favorite parts of the sketches
- Choose 1-2 design directions to explore further
- Create more detailed medium-fidelity versions
Final Steps
- Test your prototype:
- Interview 3-5 potential users
- Gather feedback on what works and what doesn't
- Pay attention to emerging patterns
- Iterate
- Update your designs based on user insights
- Repeat the process as needed
Conclusion
Paper prototyping is an essential tool for any designer or innovator. By following these steps, you can quickly validate and explore design ideas using nothing more than paper and a marker.
Tips
- Embrace "good enough"
- Everything is a prototype—don’t get too attached
- Iterate fast and often
